Roosting Bars for Chickens: The Right Size, Height, and Materials (Most Coops Get It Wrong)
Most roosting bars for chickens are the wrong width. That single mistake — a thin round dowel instead of a flat 2×4 — puts sustained nightly pressure on the exact part of the foot most prone to bumblefoot. This guide covers every spec your roost needs: correct width, height, how much bar length per bird, spacing between multiple bars, and the poop board setup that makes weekly coop cleaning genuinely fast.
Whether you’re building your first coop or retrofitting an old one, these are the measurements that actually matter.
Why Chickens Need Roosting Bars at All
Chickens descended from red junglefowl — birds that slept in trees every night to stay above ground predators. Domestication didn’t erase that instinct. Even in a padlocked coop with zero predator risk, your hens will hunt for the highest available sleeping spot every single evening without fail.
The drive runs deep enough that commercial poultry studies found up to 90% of hens roost within minutes of lights-out when high perches are available. It’s not a preference. It’s hardwired.
Two other things happen up on that bar worth knowing about. Chickens can’t see in the dark, so roosting high is genuinely protective — birds on the ends of the line actually sleep with one eye open, one brain hemisphere staying alert for threats (a real phenomenon called unihemispheric sleep). Huddling on the roost also conserves body heat on cold nights. And since chickens produce roughly two-thirds of their daily waste overnight while roosting, a proper roost-and-poop-board setup keeps the coop floor cleaner than you’d believe possible.
Sleeping on the ground increases exposure to manure-borne pathogens. Give your birds a proper roost and they’ll use it every night, no training required.
The Width Problem: Why Your Roosting Bar Material Matters More Than You’d Guess
Here’s the detail most first-time coop builders miss: chickens don’t wrap their feet around a perch the way wild birds do. They sleep flat-footed — weight resting on the ball of the foot and the underside of the toes, not gripping.
That changes everything about what makes a good roosting bar.
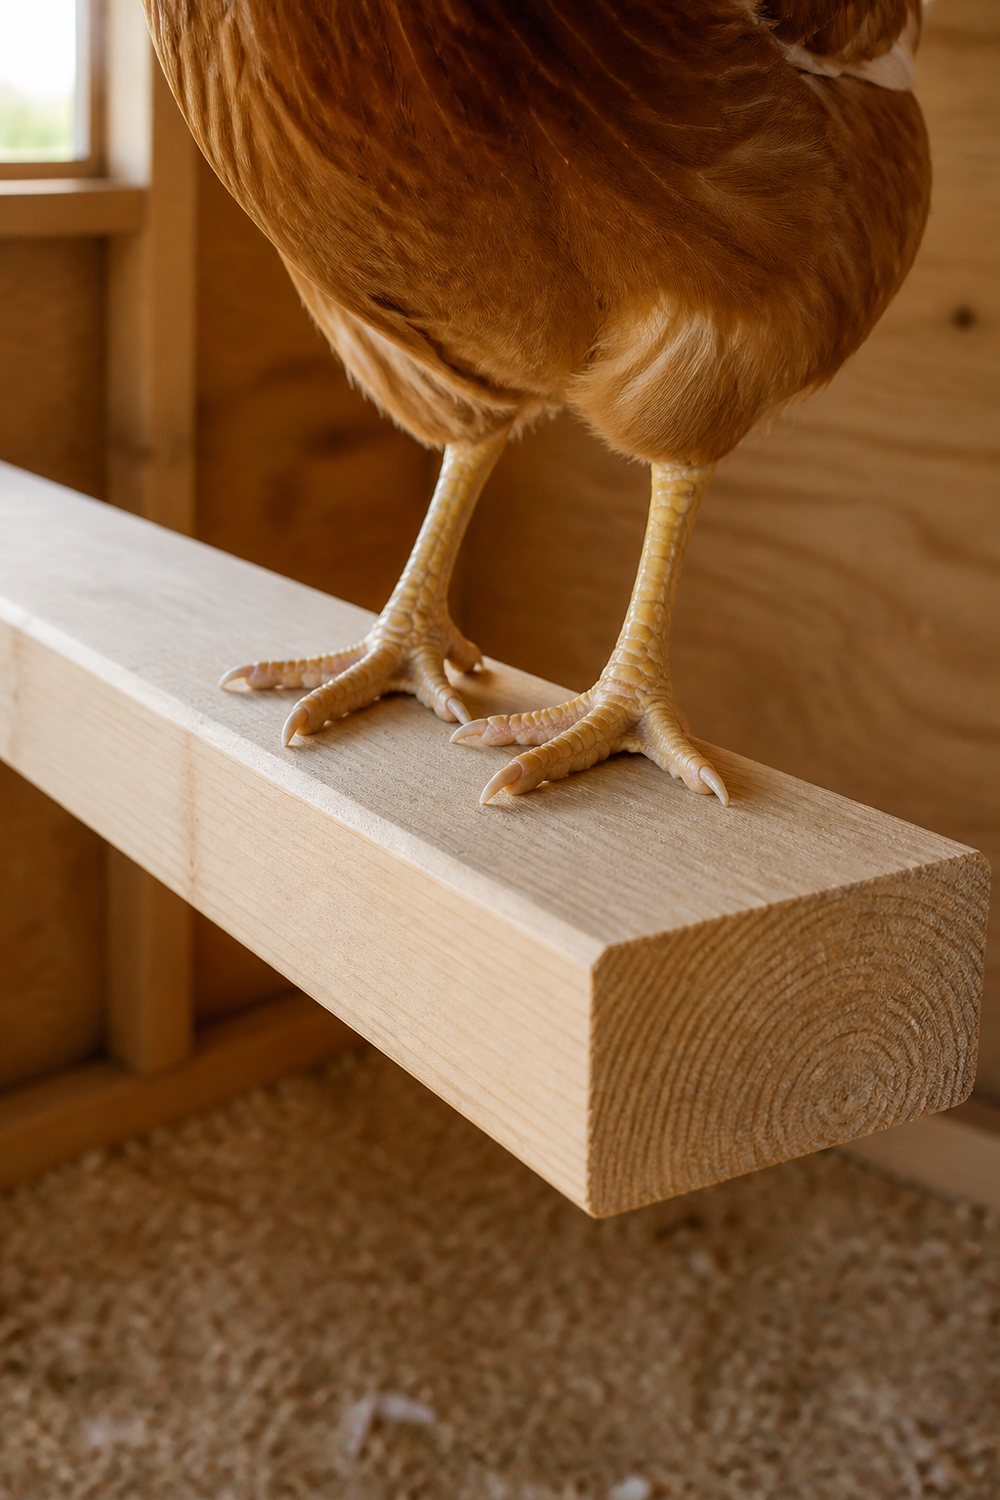
The 2×4 is the gold standard. Installed with the 4-inch side facing up (flat), a standard construction-grade 2×4 gives hens a wide, stable platform to rest their full foot on without gripping pressure. In winter, the flat bar lets a bird sit completely flat-footed with her feathers draped over her toes — those feathers act as insulation and block frostbite.
Round dowels under 2 inches in diameter force chickens into an unnatural gripping position all night. That sustained pressure on the footpad is directly linked to bumblefoot — a bacterial infection that starts as a black callous and can progress to abscesses needing veterinary treatment. Multiple poultry resources report significantly higher bumblefoot rates in flocks using thin round roosts compared to flat boards.
Before installing, sand the edges. A fresh 2×4 from the lumber yard has sharp corners. Ten minutes with medium-grit sandpaper to slightly ease them prevents foot abrasions — you’re not rounding the profile flat, just removing the sharpness.
For warm climates, a natural branch 2–3 inches in diameter (bark stripped, surface sanded smooth) is a perfectly solid alternative. The “chicken gym” builds all over Pinterest almost always use thick natural branches, and they work well as long as diameter stays above 2 inches. Below that, you’re back to the gripping-pressure problem.
Skip these entirely:
- Metal bars — conduct extreme temperatures, slippery when wet
- Plastic bars — slippery, no give, can’t be gripped even lightly
- Thin round dowels under 2″ — bumblefoot risk
- Any bar positioned lower than the nest boxes (chickens always target the highest sleeping spot — if nest boxes win, you’ll find hens sleeping in them and fouling your eggs every morning)
How High Should Roosting Bars Be?
For most standard breeds — Rhode Island Reds, Plymouth Rocks, Australorps, Wyandottes — the target range sits between 18 and 24 inches from the coop floor. Most backyard flocks land right around 18–20 inches and stay there happily.
Heavy breeds need it lower. Orpingtons, Brahmas, and Jersey Giants carry a lot of weight on their joints. Jumping down from a 24-inch roost repeatedly damages feet over time — exactly the repeated landing stress that leads to bumblefoot. Keep large-bodied breeds between 12 and 18 inches and add a step or ramp if you can.
Bantams go the other direction. Most bantam breeds are capable flyers and actually prefer roosting higher, so 12–18 inches is a floor for them rather than a target. A slightly thinner bar works fine for small birds — a 1.5 to 2-inch rounded branch handles bantam weight without issue.
Two specifications that don’t get adjusted regardless of breed:
- The roost must sit higher than the nest boxes. Chickens always migrate to the highest sleeping spot. Nest boxes that sit at or above roost height will fill with sleeping hens overnight, foul the nesting material, and produce dirty eggs every single morning. Keep the roost at minimum a few inches above the top of any nest box.
- Leave at least 6 inches of clearance from the wall. A bar pressed against the wall means tail feathers drag and dirty every night, and birds can’t balance comfortably on the landing.
If coop height forces the roost above 24 inches, use a staggered ladder approach: multiple bars ascending like stair steps, so birds hop up incrementally rather than launching from the floor. Heavier breeds especially benefit from this — three bars stepping up in 6-inch increments beats one high bar with a hard drop.
How Much Bar Length Per Chicken
This is where small coops consistently fall short:
| Breed Type | Bar Length Per Bird |
|---|---|
| Standard breeds (RIR, Wyandotte, Australorp) | 8–12 inches |
| Large/heavy breeds (Orpington, Brahma) | 10–14 inches |
| Bantams | 6–8 inches |
A flock of six standard hens needs 48–72 inches of bar length — four to six feet. One 8-foot 2×4 covers that with room left over.
Plan for the summer spread, not the winter huddle. January looks fine: hens pile on top of each other for warmth, and an undersized bar seems adequate. July tells the real story — each bird wants personal space, and a short roost turns into a nighttime pecking-order battle every evening.
Spacing Between Multiple Roosting Bars
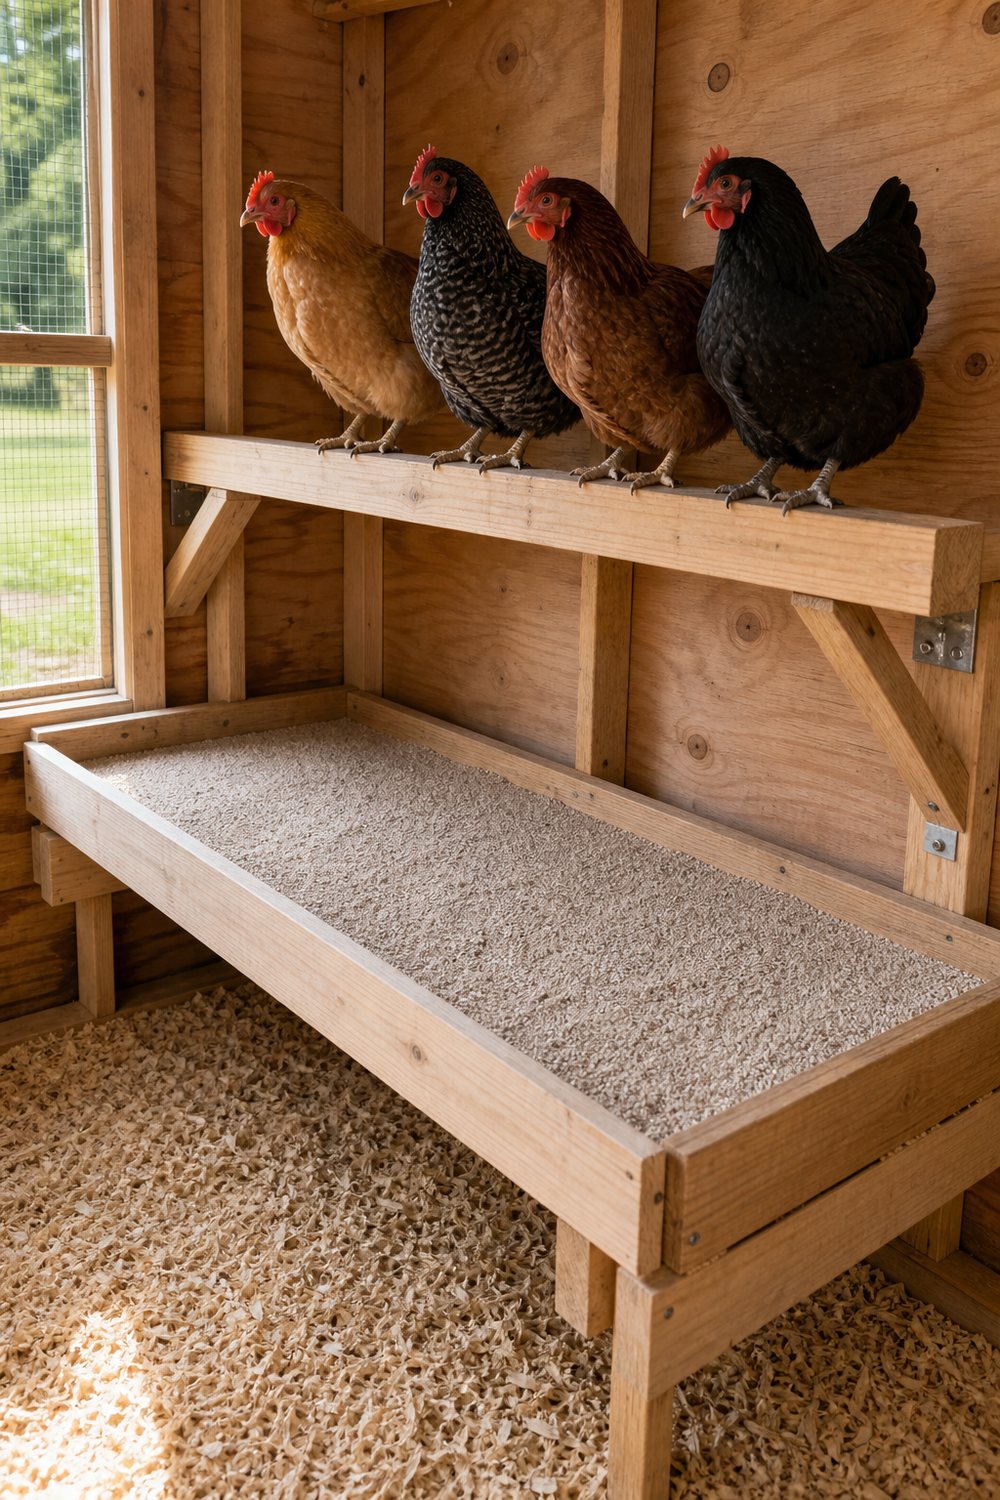
Installing more than one bar is strongly recommended for flocks of six or more — and when you do, the spacing between bars matters as much as the bars themselves.
Horizontal distance: 12–18 inches between each bar. Closer than 12 inches, and birds on the upper bar are roosting directly above birds on the lower bar. That’s a manure problem the bird below cannot avoid all night.
Stagger the heights. Each bar sits a few inches higher than the one in front of it — stadium seating for chickens. Dominant hens claim the highest bar, mid-rank birds settle in the middle, and lower-ranking birds take the lowest option without anyone sitting beneath someone else. This one layout change eliminates most nighttime roosting aggression because there’s no single “best” bar to fight over — just a graduated set, with the flock sorting itself naturally by pecking order.
Corner Roosting Bars: Recovering Space in Small Coops
Standard wall-to-wall bars leave corner space unused. Corner roosting bars run diagonally across a corner — on L-shaped brackets or a simple triangular frame — and add usable roost length without eating any floor footprint.
A 4×4 coop gains 5–6 feet of roost length with a corner design where a straight wall-to-wall bar only yields 3–4 feet. The birds sleep at an angle to the walls, which suits them fine. For small flocks in tight coops, it’s the most space-efficient roost configuration available.
Removable Roosting Bars: The Cleaning Upgrade Worth Making
Whatever sits below your roosting bar gets coated in manure overnight. Fixed, permanent bars make cleaning that area genuinely difficult — awkward reaching, equipment in the way, a job most people defer too long.
Removable roosting bars rest in notched wooden brackets or hook onto L-shaped supports. Lift them out in five seconds, clean the area beneath, replace. For annual deep cleans or any time you need full coop floor access, the time difference between a removable bar and a screwed-in permanent one adds up quickly.
Hinged bars take it further: mounted on a piano hinge at one end, the bar swings flat against the wall and latches, leaving the floor beneath completely clear. If your coop doubles as a storage area or you want full access occasionally, the extra 20 minutes of installation work pays off fast.
The Poop Board: The Single Upgrade That Changes Coop Maintenance
Two-thirds of a chicken’s daily waste lands below the roosting bar overnight. Without anything to catch it, that waste mixes into the coop bedding, accelerates ammonia buildup, and forces frequent full bedding changes.
A poop board — also called a dropping board or poop shelf — is a flat surface positioned 15–18 inches directly below the roosting bar. Every morning, you scrape it. The whole job takes two minutes. The coop floor bedding stays clean for weeks instead of days. If hens still choose the laying boxes at night, start with this guide on how to keep chickens from pooping in nesting boxes.
How to build one:
- Frame a 3-sided box from 2×4 lumber and attach it to the wall directly beneath the roost
- Top it with a plywood sheet or removable plastic tray
- Add a thin layer of Sweet PDZ (a zeolite mineral that absorbs ammonia and neutralizes odor), coarse sand, or coffee grounds
- Scrape every morning or every 2–3 days into a compost bin or bag
Sweet PDZ is the most popular choice — it cuts ammonia smell dramatically and the used material goes straight into compost as a nitrogen source. The difference in coop air quality is noticeable within a day.
How to Build DIY Roosting Bars for Chickens
The simplest functional roost takes about 30 minutes and runs under $15 in materials.
What you need:
- One 2×4 × 8-foot board (cut to your coop’s interior width)
- Two L-brackets (3-inch or larger, rated for the weight)
- 1.5-inch wood screws
- Medium-grit sandpaper
The build:
- Cut the 2×4 to length — measure your coop’s interior width and cut to fit with a half-inch of clearance on each end.
- Sand all four long edges: round the corners just enough to remove sharpness without flattening the profile.
- Mark your mounting height on the wall: 18–20 inches for standard breeds, 12–18 for heavy breeds.
- Screw L-brackets into wall studs at that height, positioned near each end of the bar.
- Lay the 2×4 flat-side (4-inch face) up onto the brackets. One screw per bracket keeps it removable; countersunk screws lock it permanently.
- Confirm at least 6 inches of clearance from the wall.
For a ladder-style multi-bar build: repeat with a second bar 12–18 inches in front of the first and 4–6 inches lower. Each bar steps down like a staircase, giving the flock a natural gradient to distribute themselves on.
Roosting Bar Quick Reference
| Spec | Standard Breeds | Heavy Breeds | Bantams |
|---|---|---|---|
| Bar width | 4 inches flat (2×4) | 4 inches flat (2×4) | 2–3 inches |
| Height off floor | 18–24 inches | 12–18 inches | 12–18 inches |
| Space per bird | 8–12 inches | 10–14 inches | 6–8 inches |
| Multi-bar spacing | 12–18 inches apart | 12–18 inches apart | 10–12 inches apart |
Get the width right, the height right, and the per-bird length right — and your flock will settle onto that bar every night like they’ve always known exactly what it’s for. Because they have.
Share this content: